E21 | Westford Historic Renovation | Septic, Stairs and Subs
Season 46 Episode 21 | 23m 42sVideo has Closed Captions
Tom and Charlie demo and repair the portion of the staircase that was burned in the fire.
Kevin O'Connor checks in with Mauro Henrique about the new siding, which is ready for installation, but the trim needs final color approval. Inside, Heath Eastman is preparing to start wiring the kitchen. Richard Trethewey explains the septic system needs to be replaced. Charlie and Tom Silva rebuild the staircase and install the widow's walk railing, sealing posts to prevent leaks.
Problems with Closed Captions? Closed Captioning Feedback
Problems with Closed Captions? Closed Captioning Feedback
Funding for THIS OLD HOUSE is provided by The Home Depot and Renewal By Andersen.
Support provided by:

E21 | Westford Historic Renovation | Septic, Stairs and Subs
Season 46 Episode 21 | 23m 42sVideo has Closed Captions
Kevin O'Connor checks in with Mauro Henrique about the new siding, which is ready for installation, but the trim needs final color approval. Inside, Heath Eastman is preparing to start wiring the kitchen. Richard Trethewey explains the septic system needs to be replaced. Charlie and Tom Silva rebuild the staircase and install the widow's walk railing, sealing posts to prevent leaks.
Problems with Closed Captions? Closed Captioning Feedback
How to Watch This Old House
This Old House is available to stream on pbs.org and the free PBS App, available on iPhone, Apple TV, Android TV, Android smartphones, Amazon Fire TV, Amazon Fire Tablet, Roku, Samsung Smart TV, and Vizio.
Keep Exploring

This Old House Insider Newsletter
Get This Old House exclusive stories, tips, and behind-the-scenes information delivered right to your inbox every month.Providing Support for PBS.org
Learn Moreabout PBS online sponsorshipKevin: Today... Richard: There are three reasons why the existing septic system here in Westford no longer complies.
But trust me, the new system doesn't stink.
Kevin: Then the top half of this staircase was damaged in a fire.
We'll rebuild it step by step.
Tom: And we're working on the widow's walk.
♪♪ ♪♪ Man: Ahh.
That's it.
♪♪ ♪♪ Kevin: Hey, there.
I'm Kevin O'Connor, and welcome back to "This Old House" and to our 1893 Colonial here in Westford, Massachusetts.
Now, just to give you a sense as to where we are, Westford is a town that's about 35 miles northwest of Boston and fewer than ten miles south of the New Hampshire border.
And if you recall, this house had a fire eight years ago, which means it had to be taken back to the studs because of the fire damage and because of a lot of water damage.
Charlie and his team have been tasked with putting it back together with us, and work going on all over the place.
Scaffolding is up, windows are starting to go in.
Those are all new right there.
We've got some trim work going up, and we've got Mauro out here working on a painting, although it's a little early, Mauro.
There's no siding on the house yet.
Mauro: I know.
Here's what we have for siding.
Good thing is I don't have to do anything to it.
It came coated from manufacture and it has this color yellow on it.
Kevin: So composite material.
Got the wood grain on the front right here.
Mauro: Yep.
Kevin: And it is yellow all throughout.
Mauro: Absolutely.
Kevin: So that's gonna go up and you won't have to touch it.
Mauro: I don't have to do anything to that.
But we do have to paint all the trim around the house.
Kevin: Okay.
Mauro: I also have two different colors the homeowner will look at it and they will let me know which one they like the best.
Kevin: Bright white, sort of a light gray right here.
Mauro: Light gray over there.
And we also have this color on this front porch ceiling, which they love.
They asked me to do a match, Kevin, as close as possible.
I think it looks pretty good, but they have to sign off on that.
Kevin: So they're gonna have to sign off on all of those.
And then the brackets.
Mauro: And also the brackets.
Kevin: Check these beefy things out, huh?
Mauro: They're heavy and beautiful.
Kevin: And this is all solid wood, right?
Mauro: This is all solid wood.
Kevin: Not composite?
Mauro: It has a coat of oil-based primer on it.
And that's going to be the same color as the trim, once we know the color.
Kevin: Okay.
Well, we like to see you getting after it to beat the temperatures.
Thank you, Mauro.
Mauro: Alright.
Thank you.
Kevin: So you can see that Charlie's got the equipment out.
He has attached an auger bit right here.
And he is digging footings for what's gonna be a new porch.
So there was a front porch right here.
That's going to be completely rebuilt.
And Charlie is gonna be putting them on concrete footings right there.
So work outside, but as I said, a lot of work inside as well.
With the front door out of commission, everyone is using the side entrance right here, which puts you at the foot of the back staircase up to the second floor.
And on the other side of that wall, the one full bath for the first floor.
This area right here, big kitchen to a dining area.
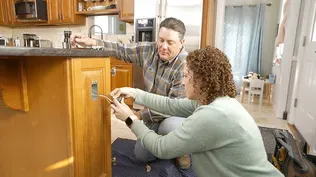
And an electrician on board.
Heath, how are you?
Heath: Good.
How are you doing?
Kevin: I'm doing alright.
So are you starting your rough?
Heath: Starting the layout now, yes.
We have the framing in place.
We have the plans.
Now we can kind of see what matches up, what works, and what doesn't.
Kevin: And what is the layout generally?
Heath: So this is our kitchen obviously.
And this is huge.
This is countertop from the whole way down all the way there and all the way around.
Kevin: Big window off to the backyard.
Heath: Just two little breaks in it.
One for the sink, one for the stove.
Kevin: Oh, I'm seeing this oven right here.
Is this -- Is the strapping represent counter height?
Heath: Yeah.
So what I usually do is just to make it easier to mark things up is I'll set this at finished counter height, and kind of gives me a guide of where I can and can't go.
Kevin: Okay.
So I see the oven here.
I see the lowers.
I don't see any uppers.
That's the design choice?
Heath: So no uppers, just a couple of shelves.
So that leaves us with no under cabinet lighting whatsoever.
Kevin: Oh.
Heath: The other thing is they don't want any recessed in the ceiling.
Kevin: Ooh.
Throwing you curveballs all over the place.
So no recess, no under counter.
Big space.
Heath: Big space.
So we have a couple of things.
Kevin: Pendants everywhere?
Heath: We have 2 to 3 pendants over the middle here.
We're gonna have a table that's going to move.
So we don't want to set those boxes just yet until we locate it and get the exact size.
Kevin: Right.
Heath: And then we have sconces that are going over the windows.
Now, this isn't something they chose, necessarily.
We're just kind of getting a starting point to see what's gonna work and what's not.
But this is the space we have to work in.
By the time we trim the window out and put the ceiling in just to light this.
Kevin: So, I mean, it's a good look.
And the new upper cabinets is kind of popular these days.
Do you get enough light out of just a couple sconces and some pendants?
Heath: So I think the best bet for this is we're not sure of the style.
Bring a few in, wire them at night, maybe something with a clear glass, something with a larger bulb, see how much light they truly give off and see what's working and what isn't.
Kevin: 'Cause it's a big space, and you really got to light it up.
Heath: It's a big space and lots of light.
You don't want this dark.
Kevin: Okay.
Well, if anyone can figure it out, you're our guy.
And on the other side of that big window, I am told that there is a plumber looking at the septic system.
The other day, he got a handle on what he is facing in terms of his own challenges.
Heath: Sounds good.
Kevin: I'll check in with him.
See you, Heath.
Heath: See ya.
♪♪ Richard: 25% of American homes rely on a septic system to process the waste and water from the house, and we have one here in Westford.
But this system doesn't comply on a bunch of reasons now.
First of all, it's too close to the building.
Well, the reason for that is we've added this addition.
And code says the septic system has to be at least 10 feet from the house.
And now with the addition, we're at 3.
So it's too close.
It also is too small.
We've added some plumbing fixtures and bathrooms here, but we also added the carriage house in the future with its plumbing.
So this 1,000-gallon tank is no longer large enough.
It has to be larger to service the two buildings.
And finally, it's too high.
The old drain used to leave the building right here, and we want to make sure that all the drainage works with pitch from both this building and the carriage house.
So the new drain is down by about a foot because we've added future bathroom in the basement.
So now we want it to work with pitch, and that means this tank is too high, so it has to go.
But first, let's review how septic systems work.
The design of a conventional septic system is pretty simple.
It starts with a tank that has two chambers.
Liquids and solids leave the plumbing system in the building and are directed into the first chamber.
There, most of the solids remain and begin to break down.
Once the level rises up, liquid flows over the petition into the second chamber.
Here, oxygen breaks down remaining solids inside into a liquid called effluent.
There's also a scum layer to allow the parts that can't break down, to float on the top, and not destroy our leaching field downstream.
That effluent liquid is routed to a leaching area, where the liquid will drip into a properly sized distribution field.
There, the liquid will filter down into the earth in a safe way.
Our hole is ready and a very big truck is here.
So that must mean our new tank has arrived.
[ Truck backup beeper beeping ] Kevin: Richard, you got yourself a delivery.
Richard: Yeah, a little bit of time has passed, but we're taking delivery today on the septic tank.
Now, this thing is 2,500 gallons.
It's all concrete.
It's a beast.
It's going to get lifted over here into this hole that's now been dug perfectly.
They engineered it just right for the size of the building, the number of bathrooms.
And it'll come by gravity to this point into the septic tank.
Right here will be this box.
And inside this will be a pump.
And so that -- the water will come through the septic tank into the pump chamber and then be pumped out to the leaching field.
And because it needs to be serviced, there'll be a manhole they put on the top because someday you'll have to get in there.
Kevin: So they've got a marked out big tank here, small tank there, and they're gonna just crane it in?
Richard: Yeah.
And they're ready to go.
Let's get out of the way.
We're holding them up.
[ Machine whirring ] ♪♪ So that little baby weighs 24,000 pounds.
That's 12 tons of concrete.
Kevin: Wow.
Just for one tank.
Richard: Yeah.
And so it's gonna come in down into the hole.
But what's really important is what you're not gonna see, is the stone.
They got a heavy stone base right here.
Because that much weight, you want to make sure it doesn't settle into the ground, so...
I always marvel at the skill set of these operators, these crane operators, getting this thing fit down into this so perfectly.
Kevin: Yeah, most people can't double park.
[ Laughs ] And this guy just brought a double trailer in and put it 2 feet from the hole.
Richard: With what?
With 20,000 pounds total.
Kevin: What could go wrong?
Richard: So this is a mastic tape that'll provide a seal between the cover that's on top of this.
Now they've got to lift that cover in.
♪♪ Kevin: How much is the cover?
Richard: Oh, that's only 5 tons.
♪♪ Kevin: Nailed it.
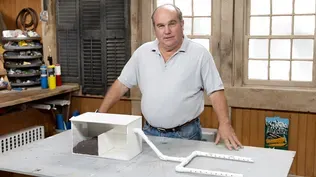
Richard: So, a really critical part of these septic systems is a distribution field, a leaching field.
And the, you know, our system is now bigger because of the two buildings and the new tank.
So now the new leaching field is out here where the old one was, but it's gonna be a little bit different.
Dave Schofield is going to help us on this one.
Kevin: Dave, nice to meet you.
David: Kevin.
Richard.
Richard: So take us through what you got here.
David: Okay.
This -- On the left side, this cross section represents traditional system here.
Effluent comes into the pipe.
Pipe has holes in it.
Trickles down through the stone, travels to the bottom, hits a low area.
You got to keep in mind that this -- this is not pure water we're talking about here.
This has -- This has fats, oils, greases, suspended solids, all kind of things in it.
So we need -- we need to digest that to prevent clogging.
What will happen in a failing -- failure situation, it can pond and that can block off the oxygen transfer.
It'll accumulate.
You'll get solids building up like -- like this is looking like here.
Richard: Yeah.
David: That doesn't allow this stuff to digest and accumulates there in the bottom.
That's the start of a system failure.
It happens in one point, and then it moves throughout the system, moves from a low point and then gradually moves higher and higher.
Kevin: So, Dave, I heard "digest" and "oxygen."
You're telling me that in a properly working system, solids are okay, just so long as they get enough oxygen, they can break down naturally to basically nothing?
David: Right.
That's correct.
Kevin: So what is your solution for that problem?
David: Solution to that is to bring the system up higher.
We have enough surface area that is in an oxygen rich condition that allows for the digestion to occur.
This system tends to be approximately 6 inches below grade.
So there's oxygen present at these interfaces here.
Kevin: Oh.
So you're saying closer to the surface, more chance for oxygen to get in?
David: Right.
Kevin: Huh.
David: Also, this system spreads it over the mat that's all around it.
Richard: So it's pretty ingenious.
You know, if you look down in here, there's a mesh down at the bottom.
And then this holds the pipe up a bit.
So there's holes all the way along so the water will drip down into this sort of almost like a subway.
Kevin: Yeah.
It looks like the stuff that we use behind sidings.
Richard: That's right.
So what it does is it provides a gap for that water and effluent to sort of work its way through, so there's always a space for the oxygen and it can wick its way around.
So we've really increased that surface area unbelievably.
Kevin: So I get the oxygen part 'cause it looks like you built, like, an air gap there.
But to be honest with you, Richard, that does not look much wider than that right there.
Richard: Right.
Well, this is a little mock-up here.
Let me show you the whole system here.
David, thank you.
Kevin: Thank you, David.
David: Thank you.
Richard: So...So look at here.
This is... Kevin: Oh, yeah.
Richard: This is it.
So now, here -- here's what the size of the old pipe was right there.
Kevin: Okay.
Richard: Now here's the new pipe.
And look at -- It's 39 inches.
So now, when that water comes down, the effluent comes down into this space, it will come out through the diffuser and it'll wick all the way.
And now you've got this surface area that can't be beat.
Kevin: So more effective, I guess, in the breakdown.
How does it help us in terms of, you know, designing, paying for, building these things?
Richard: So with all this surface area, the actual distribution leaching field can be smaller, about 40% less area than a conventional.
Kevin: So when you say this, between -- Richard: Between these two stakes.
Between these two stakes right here.
But the convention would also require an additional 15 feet of buffer area.
Kevin: What?
Richard: 15 feet on all sides.
And many people just do not have that kind of space.
Kevin: Instead, how far do we have to go or --?
Richard: One foot from here.
Kevin: So there are people who can't do an addition because they can't find a big enough yard for a field.
The septic becomes the governing issue.
Richard: Right.
The other thing is you drive to some houses and you say, "Oh, I can see their septic system -- it's right there."
Kevin: I got a neighbor.
I got a neighbor.
Richard: It's the mountain in their yard.
Kevin: He bought a septic system with a house.
Richard: [Laughs] That's right.
Kevin: Very cool.
Richard: On the home stretch.
Kevin: Sounds like a big improvement.
Richard: Thanks.
♪♪ ♪♪ Charlie: There's a lot of beautiful staircases in this house, and luckily, this is the only staircase that was damaged when the fire took the entire roof off.
Tom: That's right -- you can actually see the fire line right here on the railing, the back of the balusters going right down here.
Got the stringers, the treads, and the risers, and even the skirt board, but only on this top section right here.
So I think what we need to do is basically just rebuild this top section.
We can take some measurements, go pick up some parts, and we can get it rebuilt.
I'll start the demo.
We can rebuild it when you get back.
Charlie: Sounds good.
Tom: Okay.
[ Hand saw whirring ] ♪♪ ♪♪ ♪♪ ♪♪ ♪♪ Charlie: Alright, I got the treads.
Tom: Okay, good.
Charlie: That's all you got done?
Tom: Yeah, that's all I got done.
I had to demo everything up here.
I got the two skirts cut for each side right here.
And as you know, the stringers had to get replaced.
Mainly because they were too short.
Because we have a new floor height off of the platform, the riser height was wrong.
So they were -- they had to come out.
Charlie: Alright, so what do you want me to get started on?
Tom: Let's start cutting the riser and the treads to length and make them all equal.
Charlie: Sounds good.
♪♪ [ Power saw whirring ] Tom: Mark it.
♪♪ ♪♪ Charlie: Well, this looks great.
So now what we have to do is we're going to take out this newel post.
And we're actually gonna put a half wall in here.
Tom: Yeah.
Railing height.
Charlie: At railing height.
The railing will be on that.
The half wall will come right down.
Then we're gonna cut the banister back.
Let it tie right into that wall.
Tom: Yep.
Yeah.
It's gonna look good.
Charlie: Well, I wanna say this looks great and I can't help but stare.
Tom: Well, I will say the little stairway had its ups and downs, but we got through it.
Charlie: We really did.
Tom: Yep.
[ Truck backup beeper beeping ] ♪♪ Kevin: Hey, Brian, how are you?
Brian: Hey, Kevin.
Kevin: Good to see you again.
Brian: Nice to see you.
Kevin: Like to have you on the job.
That means we got rough going on, huh?
Brian: We do.
And it is a very unique project.
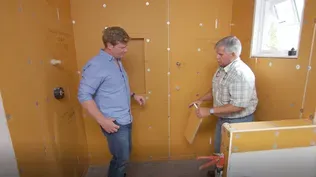
Kevin: In what way?
Brian: So we have two full bathrooms in this house, one here on the first floor... Kevin: Yeah.
Brian: ...and we have one stacked right above us on the second floor.
Kevin: Nice.
Brian: We have a laundry on the second floor right outside the door of that bathroom.
Kevin: Okay.
Brian: And our kitchen right outside the door here.
Kevin: So unique in the sense that you've got all of the plumbing sort of tucked in this one corner?
Brian: That's correct.
Everything is confined to this side of the house.
Kevin: Yeah.
So this is a downstairs one.
What have you got for layout here?
Brian: So we have a shower, toilet... Kevin: Yeah.
Brian: ...and our sink.
And Charlie built us a wet wall to bring our stack up to the second floor bath, but it also gives us another wall to just get our vent up to the attic.
Kevin: Cool.
And then easy to tie in a close laundry room and a kitchen that's right here.
Brian: Yep.
So our main drain drops right below us, drops into the basement floor and exits out the back of the building.
Kevin: Very nice.
Alright.
Well, back at it, and I guess no complaining from you.
Everything's in one place.
Brian: Absolutely.
Makes my job a lot easier.
Kevin: Thanks, Brian.
We'll see you.
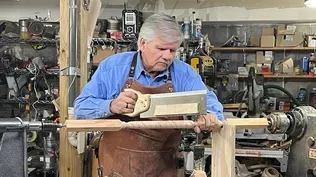
♪♪ ♪♪ Charlie: Alright, Tom, let's get started on the railings for the widow's walk.
There's our line for outside of our posts.
Tom: Right.
Gonna be four of them across the front.
Now, we had the roofer come and put our rubber down to seal the roof so we can do our railing system.
Now, this is considered a flat roof, but we know a flat roof really isn't flat.
And it shouldn't be flat because we want to basically take the water from, let's say, the center of the roof and disperse it off to the edge.
In this case, we want to take the water from around the roof hatch and pitch it away.
So we ordered this foam right here that's thicker on one end than it is on the other.
So when it lays on top of the flat roof, it actually forces the water to go to the edge away from our roof hatch, causing no puddles.
On -- Now this is also an underlayment for our roof -- our rubber roof -- to attach to.
This first has to be attached to the substrate or the plywood with screws and large washers.
If you see right here, you can see the large rings of the washers.
In the center of that is a screw, and they're fastened so many inches apart and in the joints.
The reason you need to have the washers, because when wind blows by, it creates a negative pressure on the roof if it wants to lift and flutter.
If the wind is strong enough, it would rip the rubber and the substrate right off of the roof, exposing it to water damage.
Now, because we're putting a railing system here and we still have flashing to install on the outside edge, we want to make sure that we have good fastening for the nails and for the screws for the railing.
So we put in a wood filler on top of the wood and the structure below.
So if you can see our taper goes here and into the plywood.
Charlie: And the original house had a widow's walk with a roof hatch and a railing system.
And we're putting it all back.
But this time it's gonna be a maintenance-free railing system.
So now it's time to put our metal posts in and screwing them down through into all of our framing below.
Well, let's start installing the posts.
Tom: Okay.
Charlie: Our chalk line represents the outside of our post, and we have four posts on this side with three equal spaces.
Tom: Right.
We've got our marks right there.
So I'm gonna place it on our mark.
Now what we're gonna do is we're gonna put the four screws in, but we're not gonna fasten it completely 'cause we've got to take it out again.
Charlie: Ready?
Tom: Yep.
[ Power drill whirring ] So this basically marks our holes.
Charlie: Once we get these all in... we can put our latch sealant in.
Tom: Yeah, we'll take it out again.
Okay.
Now we have our hole location.
We can put our sealer around the bottom.
Charlie: Yep.
It's made for rubber roofs.
Tom: Right.
Nice and thick.
Then we put a sealant in the hole.
♪♪ Charlie: Set that down.
Now, let's just put this one.
Put a level on it.
Tom: Alright.
We gotta tap that back one in just a hair.
Charlie: Perfect.
Alright.
Tom: Okay.
Charlie: We have three more to install on this front side now.
Tom: Right.
Now, these are sealed.
But the roofer has to wrap these with uncured rubber to make them waterproof.
Charlie: Nothing's getting in there.
Tom: Nope.
Alright, so we have a few more posts to go, and to hide the steel structure of the railing, we're gonna use this vinyl sleeve.
Slip it on.
And we attach our railing top and bottom railing and all the balusters.
Charlie: And to protect the roof, we have this walking pad with a two-faced tape on the back of it that will hold it down to the rubber and allows the water to drain right through.
Tom: And that's important to protect the roof, like you said.
Charlie: That's right.
Tom: It's gonna look great.
Charlie: It's going to look really nice.
♪♪ Kevin: Alright, gang, since most of us are here and because we're in Westford, Mass., a historic town, I thought I'd try something different -- a trivia question.
Tom: Trivia?
Kevin: Yeah.
You guys up for it?
Mauro: Yeah.
Kevin: Good.
Alright, so here it goes.
The local high school, Westford Academy, it has a bell inside that was cast back in 1793.
And the question is, any guesses who cast that bell?
Anyone?
Mauro?
Mauro: I knew it, but I can't remember right now.
[ Laughter ] Richard: George Washington.
Kevin: George Washington, the first president.
Heath: Paul Revere?
Kevin: Paul Revere's on the list.
Pops?
Tom: Davy Crockett.
I don't know.
Kevin: Could have been you.
Richard: Yeah.
Kevin: 1793.
Tom: Could have been.
Yeah.
It was probably my grandfather.
Charlie: I'm gonna go with Heath.
Kevin: Oh, you think he did it?
Charlie: Well, not Heath.
Kevin: He's a little young.
Charlie: Yeah.
Go with the Paul Revere.
Kevin: Okay, so 1793, bell was cast by... Paul Revere.
You're right.
Yeah.
Richard: Oh.
Kevin: It was the fifth bell that he cast, but he went on to become a foremost bell caster here in this country, which is pretty cool.
Richard: Yeah.
Kevin: And here's another thing which I find more interesting.
In 1799, one of Paul Revere's kids actually went to Westford Academy.
His name was John.
And get this, it was his 16th child.
Charlie: Wow.
Richard: This guy was prolific.
Kevin: Finally got it right.
Paul Revere it is.
We got a lot coming up next time.
And so until then, on behalf of everybody, I'm Kevin O'Connor for "This Old House" here in historic Westford, Mass.
Heath: Do I get a prize?
Kevin: That's it right there.
That's what you get.
Tom: I almost guessed Paul Revere.
Heath: But you didn't.
Tom: I know.
I guessed Davy Crockett.
Heath: Davy Crockett.
Kevin: It was not Heath.
Charlie: It was not Heath.
Kevin: [ Laughs ] ♪♪ Kevin: Next time on "This Old House," we'll reveal the final kitchen design.
Woman: I wanted to have minimal upper cabinets.
Kevin: Yeah, we heard about that.
Mark: And why we're using old stone on this new foundation.
Kevin: I remember helping you cut this opening for the new garage, but you were able to repurpose it.
Then I travel to Switzerland to learn more about their vocational education program, which is one of the finest in the world, and to learn why their carpenters still wear this traditional outfit.
That's next time.


Support for PBS provided by:
Funding for THIS OLD HOUSE is provided by The Home Depot and Renewal By Andersen.